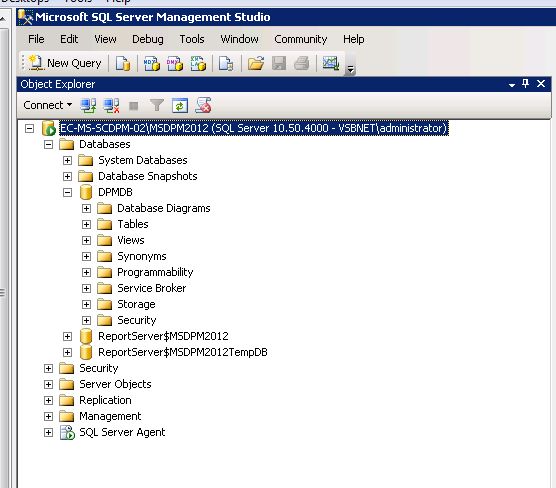
All information concerning DPM backup (tape’s barcodes, protection groups, dates and time, schedule, policy etc.) is stored in centralized SQL Server Database DPMDB
DPM/SQL Performance
DPM is largely depending on its SQL database. All settings, jobs and recovery information is hold in the DPM database.
When the DPM database has performance issues then this will also impact the performance of the DPM console.
One of the possible performance issue are fragmented Indexes in your database.
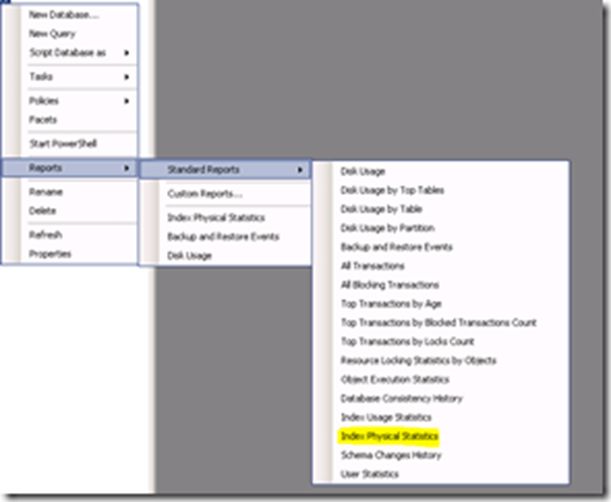
The Report Index Physical Statistics show the status of the fragmentation
Rebuild indexes
When the indexes are heavily fragmented then you need to rebuild them. You can do that by hand, but that’s a ‘hell of a job’. Therefore we use the script below which will rebuild every index existed in database with fillfactor of 80.
DECLARE @TableName VARCHAR(255)
DECLARE @sql NVARCHAR(500)
DECLARE @fillfactor INT
SET @fillfactor = 80
DECLARE TableCursor CURSOR FOR
SELECT OBJECT_SCHEMA_NAME([object_id])+’.’+name AS TableName
FROM sys.tables
OPEN TableCursor
FETCH NEXT FROM TableCursor INTO @TableName
WHILE @@FETCH_STATUS = 0
BEGIN
SET @sql = ‘ALTER INDEX ALL ON ‘ + @TableName + ‘ REBUILD WITH (FILLFACTOR = ‘ + CONVERT(VARCHAR(3),@fillfactor) + ‘)’
EXEC (@sql)
FETCH NEXT FROM TableCursor INTO @TableName
END
CLOSE TableCursor
DEALLOCATE TableCursor
GO
One of the parameters you setup during Protection Group configuration is synchronization.
Synchronization is the process by which Data Protection Manager (DPM) transfers data changes from a protected file server to a DPM server, and then applies the changes to the replica of the protected data. DPM relies on synchronization to keep replicas synchronized with the protected data on the file servers.
Synchronization frequency
You can choose between two modes of synchronization: Only before each shadow copy is created or Nearly-continuous (hourly). If you are protecting data that changes frequently throughout the day, you may want to synchronize your data hourly. If you are protecting data that changes less frequently, you can schedule fewer shadow copies and synchronize your data only before each shadow copy is made. For more information, see How to modify protection options.
Synchronization modes
DPM provides two methods for synchronizing a replica: incremental synchronization and synchronization with consistency check.
Incremental synchronization (also referred to as synchronization) transfers changes to protected data from the file server to the DPM server and then applies the changes to the replica. When you create a protection group, you specify a synchronization schedule or accept the default schedule. In general, you can rely on incremental synchronization to keep a replica consistent with its data sources. This method is faster and more efficient than performing a consistency check because only data changes since the last synchronization are transferred and applied to the replica.
Synchronization with consistency check (also referred to as “a consistency check”) transfers the data changes from the protected file server to the DPM server but also performs block-by-block verification to ensure that all the data on the replica is consistent with the protected data. This process is slower than synchronization because all the data on the replica is compared rather than simply applying the data changes to the replica. A consistency check impacts the performance of both the file server and the DPM server to varying degrees, depending on network load, CPU processing power, and timing. If you schedule a daily consistency check, you should schedule it when other network traffic is low.
DPM automatically initiates a consistency check:
When a replica is created for a new protection group
When you protect new data sources by adding them to an existing protection group
As a daily task, if you have scheduled a daily consistency check for a protection group
Because of the processing load imposed on both the DPM server and the file server, you should only perform a manual consistency check when it is necessary to make a replica consistent with its data sources. This could happen, for example, when the synchronization log runs out of disk space or when a file server is shut down unexpectedly during synchronization.
Synchronization log
A synchronization log is a hidden file, stored on a protected volume, in which the DPM file agent records changes to data since the last synchronization job. The synchronization log makes it possible to incrementally synchronize a replica, thereby speeding up the synchronization process and minimizing the impact of synchronization activity on the network. You can increase or decrease the allocated disk space for the synchronization log, as needed.
Transfer log
A transfer log is a file, located on the DPM server, which stores pending changes to a replica. When a file agent transfers the changes in the synchronization log from the file server to the DPM server, the transfer log maintains these changes until they can be applied to the replica. You cannot modify the allocated disk space for the transfer log. DPM automatically adjusts the space allocated for the transfer log, based on the other disk allocation settings.
The same tapes cannot be used for different DPM Servers.
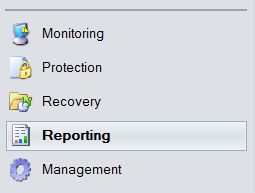
To retrieve information from this Database you use ‘Reporting’ option of the menu in the DPM Management console:
| DPM reporting offers six standard reports that you can generate, review, and analyze. These reports help you realize the full benefits of System Center 2012 – Data Protection Manager (DPM). The following table lists the reports and their definitions..Report Type |
Description |
||
| Status Report | Includes status of recently run recovery point creation and recovery jobs. The report shows trends in the frequency of errors that occur and lists the number of alerts. | ||
| Disk Utilization Report | Provides a summary view of disk capacity, allocation, and usage of disk space for the DPM storage pool. The data is collected per computer and is aggregated for all computers. You can use this report to identify the costs associated with backup for various protected computers plus identify trends in disk usage to plan for capacity. | ||
| Recovery Report | Provides details about recovery times and statistics of recovery jobs for tracking recovery performance. The data is collected per computer or protection group and is aggregated for all computers. | ||
| Tape Management Report | Provides details for managing tape rotation and decommissioning tapes. The report also displays which tapes are due to be brought back from recycling. The data is collected per library and aggregated for all libraries. | ||
| Tape Utilization Report | Provides trends in tape utilization to assist in capacity planning and making decisions about allocating additional tapes. | ||
| Recovery Point Status Report | The Recovery Point Status report provides the recovery point status of all selected data sources. This report gives administrators a high-level view of whether backup service-level agreements (SLAs) are being met for every data source. | ||

For tape rotation you use ‘Tape Management’ report.
There are several PowerShell scripts in the DPM bin directory:
Attach-NonDomainServer.ps1
Attach-ProductionServer.ps1
Attach-ProductionServerWithCertificate.ps1
AutoDeployment-UpdateProtection.ps1
AutoProtectInstances.ps1
delete-recoverypoint.ps1
delete-recoverypoint1.ps1
delete-shadowcopy.ps1
Disable-ExchangeSCRProtection.ps1
Enable-ExchangeSCRProtection.ps1
DpmCliInitScript.ps1
DPM-LIST-RECOVERY-PT-INFO.ps1
ForceFree-Tape.ps1
Get-ExchangeSCRProtection.ps1
GlobalFunctions.ps1
Migrate-DataSource.ps1
MigrateDatasourceDataFromDPM.ps1
Modify-RegisteredWriters.ps1
pruneshadowcopiesDpm2010.ps1
querydrivestatus.ps1
Remove-ProductionServer.ps1
RemoveRecoverypoints.ps1
show-pruneshadowcopies.ps1
shrink-diskpart.ps1
StopProtectionOfStaleClients.ps1
Tracing.ps1
Update-NonDomainServerInfo.ps1
Update-ServerInfo.ps1
Let’s describe the purpose and use some of them.
Attach-ProductionServer.ps1
When you Migrate a DPM Server to New Hardware
To ensure data source protection and availability of recovery points across the process, you should create a plan for the DPM server migration process, including considerations of the following factors:
The service level agreement (SLA) that you need to maintain for the period of the migration.
The length of time that you can continue running the existing DPM server before retiring or repurposing it.
Maintenance windows for the protected computers.
Important
You must be an administrator on the local computer to do migration.
To migrate a DPM server to new hardware
Install DPM on a new server. For more information, see Installing DPM.
Identify a protected computer to migrate and run
SetDPMServer.exe -DPMServerName <Name of new DPM server> on the protected computer.
Run the PowerShell script Attach-ProductionServer.ps1 from the DPM Management Shell on the DPM server.
Create protection groups on the new DPM server for the protected computers. For more information, see Configuring DPM.
Maintain the previous DPM server until the recovery points from inactive replicas on it are no longer required.
AutoProtectInstances.ps1
Starting from DPM2010, DPM has a great feature of doing auto-protecting the sql servers instance of database server. If it failed, run AutoProtectInstances.ps1
delete-recoverypoint.ps1 , delete-recoverypoint1.ps1
This scripts are not from the Microsoft. This scripts remove Inactive Recovery Points.
delete-shadowcopy.ps1
.\Delete-Shadowcopy.ps1 “volume name” will delete the externally created recovery points on the recovery point volume.
A shadow copy, also referred to as a snapshot, is a point-in-time copy of a replica stored on the Data Protection Manager (DPM) server. A replica is a complete point-in-time copy of the protected shares, folders, and files for a single volume on a file server. To start data protection, a full replica of the selected data must be copied to the storage pool on the DPM server. Thereafter, the replica is periodically synchronized with changes to the protected data. DPM creates shadow copies of each replica in a protection group according to a specified schedule. You can access the shadow copies to recover previous versions of files in the event of data loss or corruption. You can recover data and you can also enable end-user recovery so that end users can recover their own data.
If the DPM server has adequate storage space, DPM can store a maximum of 64 shadow copies per protection group. When storage area limits have been reached and a new shadow copy is created, the oldest shadow copy is automatically deleted and cannot be restored. When you select shadow copy times, DPM provides you with estimates for recovery range and maximum data loss. These estimates will help you specify a shadow copy schedule that provides adequate data protection and meets your recovery goals. A maximum of 8 shadow copies can be scheduled per day.
Disable-ExchangeSCRProtection.ps1
Enable-ExchangeSCRProtection.ps1
These scripts are used to enable – disable of an Exchange Server.
DpmCliInitScript.ps1
This script will cancel all jobs from all Protection Groups
Get-ExchangeSCRProtection.ps1
You can check if Exchange SCR protection has been enabled by running get-ExchangeSCRProtection.ps1.
The value for <Cluster FQDN> must be provided in the following format – <Cluster Name>.<Domain Name>.
GlobalFunctions.ps1
This function loads the correct DPM snapin if not already loaded.
Migrate-DataSource.ps1, MigrateDatasourceDataFromDPM.ps1
Migrate-Datasource is a command-line script that lets you continue protecting a data source (file, folder, volume, or share) to the same replica volume even after it has been migrated to a different volume on the same protected computer. You have to run the Migrate-Datasource script even if you have not changed the drive letters of the volume because DPM recognizes volumes by the GUID and not the drive letter.
Migrate-Datasource is used to migrate protected computer volumes while MigrateDatasourceDataFromDPM is used to migrate DPM volumes.
Modify-RegisteredWriters.ps1
SYNOPSIS
Adds or removes writer IDs from the list of writer IDs registered with DPM.
.DESCRIPTION
The Modify-RegisteredWriters script adds or removes given writer IDs from the list of writer IDs registered with DPM.
.PARAMETER DpmServerName
Specifies the DPM server against which this command should run. If not specified, the command is run against local DPM.
.PARAMETER List
Displays the current list of writer IDs registered with DPM.
.PARAMETER Add
Specifies that the given list of writer IDs will be added to the list of writer IDs registered with DPM.
.PARAMETER Remove
Specifies that the given list of writer IDs will be removed from the list of writer IDs registered with DPM.
.PARAMETER Writers
Comma separated list of writer IDs that need to be added/removed.
.NOTES
File Name : Modify-RegisteredWriters.ps1
Requires : System Center 2012 DPM Management Shell.
.LINK
http://blogs.technet.com/dpm/
.EXAMPLE
Modify-RegisteredWriters -List
This command displays the list of writers currently registered with the local DPM server.
.EXAMPLE
Modify-RegisteredWriters -Add -Writers “46eef637-28ca-4223-8bb6-2e87bd945179,e1cdedc6-d9d2-4fc3-8af6-5d0d0fe3e8af”
This command adds the two new writer IDs to the list of registered writers on the local DPM server.
.EXAMPLE
Modify-RegisteredWriters -DpmServerName dpm1.contoso.com -Remove -Writers 46eef637-28ca-4223-8bb6-2e87bd945179
This command removes the above writer ID from the list of registered writers on DPM server dpm1.contoso.com.
pruneshadowcopiesDpm2010.ps1
PruneShadowCopiesDPM2010.ps1 script determine which recovery points are out of range of the retention time and delete them from the DPM storage pool. But that will not effect any disk space allocated in the storage pool, it just effects space on that RP volume.
So after running PruneShadowCopiesDPM2010.ps1, you should “only” see decrease space on RP volumes. nevertheless you could see your unallocated space increase when DPM delete inactive Replica.
querydrivestatus.ps1
Identify the drive that needs cleaning from the output of the DPM PowerShell script. It will provide the library friendly name, serial number, access path, drive status, and last cleaned date/time for the drive so you can identify it in the DPM console.
Remove-ProductionServer.ps1
If you don’t want to continue protection of a protected computer, you can remove the protected computer from DPM by using the Remove-ProductionServer.ps1. This will not uninstall the DPM protection agent from protected computer. You must uninstall the agent manually.
Running this script will remove the protected computer from the DPM database (DPMDB) and from the trusted groups DCOMTrustedMachines and DPMRADMTrustedMachines
Remove-ProductionServer.PS1
Syntax: Remove-ProductionServer.ps1 -DPMServername [DPMServerName] -PSName [ProtectedComputerName]
RemoveRecoverypoints.ps1
This Script allowes you to remove Recovery Points on a Microsoft Data Protection Manager Server, after XX Days
show-pruneshadowcopies.ps1
You can run the command .\show-pruneshadowcopies.ps1 to see if there are recovery points that should be deleted.
shrink-diskpart.ps1
DPM runs pruneshadowcopiesdpm2010.ps1 nightly to delete expired recovery points. You should not have to run it manually.
If expired RP were not getting deleted, then that means the recovery point volumes were probably extended (allocated more space) if you have auto-grow enabled. That accounts for the larger disk allocated. Once allocated, DPM never de-allocates disk, it only frees space on the already allocated volumes, so since the space was freed up on the volumes (Thus only 1.4TB used) you will need to try to shrink the recovery point volumes to reclaim some of the over-allocated volumes.
Disk Allocated (in GB) 3136.66
Disk Used (in GB) 1470.79
You can download the shrink-diskpart.zip file from the following location. This may be updated at a later time and is supplied as-is.
https://skydrive.live.com/redir.aspx?cid=885774776d4f197a&resid=885774776D4F197A!120
It has three modes of operation and will prompt to select one during execution.
R = Report, S = Shrink with confirmation, A = Automatically Shrink all possible volumes
StopProtectionOfStaleClients.ps1
.SYNOPSIS
This script stops protection of stale client computers.
.DESCRIPTION
The StopProtectionOfStaleClients script finds out all the stale client computers in auto-deployment PGs and performs a stop protection with retain data on them.
.LINK
http://blogs.technet.com/dpm/
http://social.technet.microsoft.com/Forums/en-US/dataprotectionmanager
.EXAMPLE
AutoDeployment-UpdateProtection.ps1 -DPMServerName <DPM server name>
This command stops protection of all the stale client computers protected in auto-deployment PGs on the given DPM server.
If you want to know what tapes are in the DPM SQL Server database you can run this command:
Get-ProtectionGroup –DPMServer EC-MS-SCDPM-01 | get-tape | select barcode | sort | out-file C:\Temp\DPMTapeBarcodeList.txt
It’s should be in your maintenance plan to check periodically the tapes in the DPM SQL Server DB and actual physical tapes. They should match, if not you will have issue with the tape management (rotation).
Using Windows Maintenance Tools on the DPM Server
In general, you can add the DPM server to your regular maintenance schedule and use the maintenance tools provided in Windows Server 2008. However, you need to be aware of some considerations that apply to a few specific tools when you use them with DPM. Those tools are listed in the following table.
Windows Maintenance Tools and DPM
| Windows Tool | Considerations |
| Disk Cleanup: Use to remove temporary files, Internet cache files, and unnecessary program files. | Disk Cleanup is not available for replica volumes and recovery points volumes in the DPM storage pool. |
| Disk Defragmenter: Use to analyze volumes for the amount of fragmentation and to defragment volumes. | You should not run Disk Defragmenter on disks that are members of the storage pool on the DPM server. Knowledge Base article 312067 explains the issue with Disk Defragmenter as follows:”The System Shadow Copy provider uses a copy-on-write mechanism that operates at a 16-KB block level. This is independent of the file system’s cluster allocation unit size. If the file system’s cluster size is smaller than 16 KB, the System Shadow Copy provider cannot easily determine that disk defragmentation I/O is different from typical write I/O, and performs a copy-on-write operation. This might cause the Shadow Copy storage area to grow very quickly. If the storage area reaches its user-defined limit, the oldest shadow copies are deleted first.”For more information about this issue, see the Microsoft Knowledge Base article Shadow copies may be lost when you defragment a volume (http://go.microsoft.com/fwlink/?LinkId=65210). |
| Chkdsk.exe: Use to check the file system and file system metadata for errors and to display a status report of its findings. | Do not run chkdisk on DPM replica and recovery point volumes. Chkdsk causes the volumes to dismount, and if data is written to the replica volume while the recovery point volume is dismounted, it might cause a complete loss of recovery points. |
Running Antivirus Software on the DPM Server
To prevent file conflicts between DPM and antivirus software, on the DPM server, disable real-time monitoring by the antivirus software of the following directories in the DPM program files:
\XSD
\Temp\MTA
DPM is compatible with most popular antivirus software products. However, antivirus products can affect DPM performance and, if not configured properly, can cause data corruption of replicas and recovery points. To mitigate these issues, consider taking the following actions:
Disable real-time monitoring of dpmra.exe on the DPM server.
To minimize performance degradation, disable antivirus real-time monitoring of replicas and transfer logs for all protected volumes by disabling real-time monitoring of the DPM process dpmra.exe, which is located in the folder Program Files\Microsoft Data Protection Manager\DPM\bin.
Real-time monitoring of replicas degrades performance because it causes the antivirus software to scan the replicas each time DPM synchronizes with the protected server and to scan all affected files each time DPM applies changes to the replicas. The problem is resolved when you disable the feature for the replicas. For information about configuring real-time monitoring based on process name, see your antivirus product documentation.
Disable real-time monitoring of csc.exe on the DPM server.
If you experience degraded performance while using DPM Administrator Console, disable real-time monitoring of the csc.exe process, which is located in the folder Windows\Microsoft.net\Framework\v2.0.50727\csc.exe. The csc.exe process is the C# compiler. Real-time monitoring of the csc.exe process can degrade performance because it causes the antivirus software to scan files that the csc.exe process emits when it generates XML messages. For information about configuring real-time monitoring based on process name, see your antivirus product documentation.
Delete infected files on protected servers and the DPM server.
To prevent data corruption of replicas and recovery points, configure the antivirus software to delete infected files rather than automatically cleaning or quarantining them. Automatic cleaning and quarantining can result in data corruption because these processes cause the antivirus software to modify files, making changes that DPM cannot detect.
Whenever DPM attempts to synchronize a replica that has been modified by another program, data corruption of the replica and recovery points can result. Configuring the antivirus software to delete infected files resolves this problem. For information about configuring your antivirus software to delete infected files, see the documentation for your antivirus software.
Important
You must run a manual synchronization with consistency check job each time that the antivirus software deletes a file from the replica, even though the replica will not be marked as inconsistent.
Performing General Maintenance on File Servers and Workstations
General maintenance includes tasks such as disk and file maintenance, updating operating systems and applications, and protecting data by using antivirus software and performing regular backups.
When you need to perform maintenance on a protected server and do not want protection jobs to continue for the duration of the maintenance, you can use the following procedure to disable the protection agent.
Note
If you disable a protection agent for a server that is a cluster node, you should disable the protection agent for every node of the cluster.
To disable a protection agent
- In DPM Administrator Console, click Management on the navigation bar.
- On the Agents tab, in the display pane, select the name of the computer with the protection agent you want to disable.
- In the Actions pane, click Disable protection agent.
- In the dialog box, click OK to confirm that you want to proceed.
Performing Exchange Maintenance Tasks
Most Microsoft Exchange maintenance tasks should have no adverse affect on performance or data protection. However, special considerations apply when you are performing offline database defragmentation on Exchange servers that are protected by Data Protection Manager (DPM).
Offline defragmentation involves using the Exchange Server Database Utilities (Eseutil.exe), an Exchange Server utility that you can use to defragment, repair, and check the integrity of Exchange server databases.
If you must perform an offline defragmentation, you should perform a synchronization with consistency check for protected storage groups when defragmentation is complete.
Performing SQL Maintenance Tasks
Coordinate with the SQL Server administrator to ensure that the following tasks are not scheduled at the same time as the express full backup performed by DPM:
- Check database integrity
- History cleanup
- Maintenance cleanup
- Rebuild index
- Reorganize index
- Shrink database
- Update statistics
Best practices for SQL Server include running a weekly database consistency check (DBCC). You should continue this practice for databases protected by DPM to avoid backing up a database with corruption issues.
You should not use other backup applications on a computer running SQL Server that is protected by DPM.
Managing System Protection
System protection aims to protect you against two scenarios – one where your computer starts, but you have lost system files and registry; and the other where the computer does not start and you have to recover everything. System Center Data Protection Manager (DPM) enables you to protect your computer against both these scenarios.
In the past, disaster recovery entailed rebuilding a computer from scratch. This meant installing the operating system, applying updates, installing applications, and then finally recovering data. This was a laborious and error-prone method. DPM saves you the time and trouble of rebuilding your system.
In DPM, System State protection consists of protecting the operating system files, and bare metal recovery (BMR) protection consists of protecting the operating system files and all data except user data on critical volumes.
DPM uses Windows Server Backup (WSB) to perform System State backup and BMR backup. For recovery, DPM will retrieve the backups and you will use the backup data to perform recovery by using WSB.
Setting Up BMR Protection
In DPM, BMR protection covers protection for operating system files (System State) and critical volumes (excluding user data).
Space Requirements
Unlike System State protection, DPM does not have any space requirements on the protected computer for BMR protection. WSB directly transfers the backups to the DPM server.
Setting Up System State Protection
In DPM, System State protection covers protection for operating system files.
You can set up System State protection for a computer by using the Create New Protection Group Wizard. You can select System State from under the System Protection node on the Select Group Members page of the wizard.
DPM and Memory
When the memory in use by all the existing processes exceeds the amount of RAM available, the operating system will move pages (4 KB pieces) of one or more virtual address spaces to the computer’s hard disk, freeing that RAM for other uses. In Microsoft Windows systems, these pages are stored in one or more files, called pagefile.sys, in the root of a partition.
DPM requires a pagefile size that is 0.2 percent the size of all recovery point volumes combined, in addition to the recommended size (generally, 1.5 times the amount of RAM on the computer). For example, if the recovery point volumes on a DPM server total 3 TB, you should increase the pagefile size by 6 GB.
Tape Library Sharing
With System Center 2012 – Data Protection Manager (DPM), you can share a single tape library across multiple DPM servers. The following illustration shows the topology of a shared library.
Topology for Library Sharing in DPM 2012
The tape library is typically a collection of tape drives that automatically mount and dismount tape media (http://technet.microsoft.com/en-us/library/hh758124.aspx ).
How to Inventory Tapes
The purpose of inventory is to identify new tapes and recognize tapes DPM has seen before.
A fast inventory involves reading the bar code of each tape in the library. DPM can perform a fast inventory for tapes that have bar codes in a tape library that has a bar code reader.
A detailed inventory involves reading the header area of a tape in the library to identify the on-media ID (OMID) on each tape. DPM must perform a detailed inventory when a tape does not have a bar code or the tape library does not have a bar code reader.
A fast inventory detects any tape (with or without a bar code) in any library. However, to uniquely identify the media, perform a detailed inventory.
Note:
If a cleaning tape does not have a bar code or the bar code does not start with “CLN” is added to the library, and you run a detailed inventory before you mark the tape as a cleaning tape and run a fast inventory, a cleaning job will start when DPM mounts this tape during the detailed inventory.
To inventory tapes in a library
In DPM Administrator Console, click Management on the navigation bar.
Click the Libraries tab, and then select a library.
In the Actions pane, click Inventory.
In the Inventory dialog box, select Fast inventory or Detailed inventory, and then click Start.
If the tape does not have a bar code or the tape library does not have a bar code reader, the fast inventory option is disabled.
Exclude data from DPM protection
In DPM you may run into scenarios where you are backing up a folder or a volume and there are folders or sub-folders that you actually don’t need or want to protect. There is a way to “exclude” these from the backup.
THE EXAMPLE:
You want to exclude the C:\ClusterStorage folder from backing up with DPM.
THE SOLUTION:
Here is how you can exclude something from being backed up by DPM. There is a registry key on Windows servers called “FilesNotToBackup”. This key needs to be modified on the protected server with the data you want to exclude from the backup. It is that simple. Now here is how you do this.
Make a registry entry to the FilesNotToBackup list in the registry on the protected server you want to exclude data on. DPM/VSS will honor the FileNotToBackup list.
The path is: HKEY_LOCAL_MACHINE\SYSTEM\CurrentControlSet\Control\BackupRestore\FilesNotToBackup add a Multi-String (REG_MULTI_SZ) value and place something like: C:\ClusterStorage (or any data you want to exclude from backup) in the Value Data field.
The next time the data is protected it should skip the C:\ClusterStorage (or any data you have selected to exclude from backup).
Thanks
Your style is very unique compared to other people I have read stuff from.
Many thanks for posting when you’ve got the opportunity, Guess I will just bookmark this blog.
Also visit my page … Google
bookmarked!!, I love your website!
I do not even know how I ended up here, but I thought this
post was good. I don’t know who you are but definitely you
are going to a famous blogger if you are not already 😉 Cheers!
Hi, constantly i used to check website posts here in the early hours
in the break of day, because i enjoy to learn more and more.
Way cool! Some very valid points! I appreciate you penning this post plus the rest of the site is very good.
Howdy, I think your website could be having browser compatibility
issues. When I take a look at your web site in Safari, it looks fine however when opening
in IE, it’s got some overlapping issues. I simply wanted to give you a quick heads up!
Apart from that, excellent website!
I really like your blog.. very nice colors & theme.
Did you make this website yourself or did you hire
someone to do it for you? Plz respond as I’m looking to design my own blog and would like to know where u got this from.
kudos
u can do it 2 with WordPress
Thank you a bunch for sharing this with all people you actually recognize
what you’re speaking approximately! Bookmarked. Kindly also visit my site =).
We will have a hyperlink trade arrangement among us
Thanks
I like the valuable information you provide in your articles.
I’ll bookmark your blog and check again here frequently.
I’m quite sure I will learn plenty of new stuff right here!
Best of luck for the next!
Very good post. I amm going throughh many of these issues as
well..
What i don’t understood is if truth be told how you are not actually a lot more well-favored than you may be now.
You’re very intelligent. You understand therefore
significantly when it comes to this topic, produced me in my opinion believe it from
so many various angles. Its like women and men don’t seem to
be interested except it is one thing to accomplish with Girl gaga!
Your personal stuffs nice. Always handle it up!
Thankfulness to my father who told me on the topic of this weblog,
this web site is really amazing.
My brother recommended I may like this blog. He was entirely right.
This put up truly made my day. You cann’t believe simply how
so much time I had spent for this info! Thank you!
Excellent article! It’s apparent you’ve gone to a lot of trouble to research and write this article. Thanks for caring so much about your content.
Hi, i think that i saw you visited my site so i came to
“return the favor”.I am trying to find things to improve
my site!I suppose its ok to use a few of your ideas!!
Just wish to say your article is as amazing. The clearness for
your post is simply spectacular and that i could suppose you’re knowledgeable on this subject.
Fine together with your permission let me to grab your RSS
feed to keep up to date with drawing close post. Thank you a million and please continue the gratifying work.
Exceptional post however I was wanting to know
if you could write a litte more on this subject? I’d be very thankful if you could elaborate a little bit further.
Bless you!
It’s amazing in support of me to have a site,
which is helpful designed for my knowledge. thanks admin